How to fix Reverse Osmosis System
Most common reverse osmosis system problems
- No water
- Little or slow water
- Continuous drain/ no shut-off
- Noisy gurgle
- Taste or odor
- Leaks from air gap faucet
- leaks from a fitting or filter housing
How to fix your reverse osmosis system
https://www.youtube.com/watch?v=F6iuuKjKNFc
No, slow, or very little water
- Permeate flow rate: Close the tank valve, and then open the faucet handle. After a steady drip begins, measure the output for 60 seconds.
- Drain flow rate: Disconnect the tubing connection where the 3/8 tube hooks to the drain line. Allow it to run into a large measuring cup for 30 seconds.
- Feed pressure: At this point, recording what the feed pressure is in your system would help, but that may not be possible. If you're installing your system for the first time, there's no set pressure reading to go on, but this could be part of the issue.
- Tank pressure: A simple tire gauge applied to the air valve under a blue cap on the side of the tank will give a close reading. It should be 5-7 psi.
- Improper hook up: Look at pictures of installation that show feed connection and drain connection.
The RO storage tank
Check the tank to see if it's full of water or not. If it's full, open the faucet and check the flow rate. If nothing is flowing, check to make sure the valve is in the open position (handle in line with the tubing). If everything looks right, check to see if any pressure is in the tank with a tire pressure gauge. If none, add pressure with a bicycle pump with the faucet open until the tank empties. Once the tank is emptied, regulate the pressure to 5-7 psi. If water spurts out when checking for pressure, then the tank's diaphragm has lost integrity, and the tank should be replaced.
If the tank is full and pressure exceeds 20-25 psi, with no water to the faucet, make sure the tank is functioning. First, turn off the tank valve, then, disconnect the tank tube from the RO system and see if water flows into a bucket when the valve is on. If so, check the postfilter to make sure it's not clogged.
Constant run to the drain
The reverse osmosis system shuts down when tank pressure reaches 2/3 of supply line pressure and the ASO valve closes. Constant water running to the drain simply means that the ASO is not shutting off. The ASO operates if the membrane, flow restrictor, tank, and check valve are all performing properly. You can test this quickly by turning the tank valve off to see if the ASO stops water flow to the drain. This may tank a few minutes depending on membrane output.
Possible causes:
- Flow restrictor is missing or failed. Flow rate test should identify a large amount of water to the drain. This is accompanied by lots of noise.
- Tank is not filling enough to build needed pressure. A flow rate test should identify if there's a membrane production issue.
- ASO valve is stuck in a closed position. This problem is solved by completely disconnecting the valve to make sure all pressure is off the assembly.
- Check valve is bleeding pressure, preventing the system from reaching shut off pressure. Test this with a full tank of water while the tank valve is open. Turn the water supply off. If the water still flows to the drain, then the check valve is bleeding pressure. This type of failure is unusual, but still important to look for.
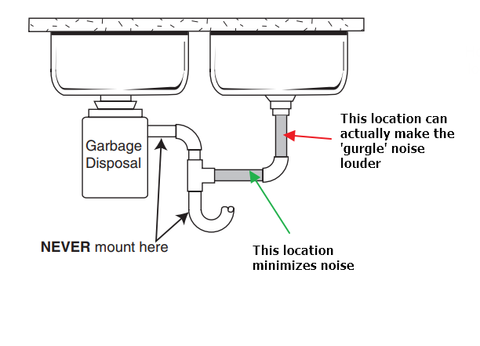
Noisy Gurgle
Loud, noisy water running to the drain is typically the result of too much water to the drain. Use the drain flow rate test to identify this problem. The location of the drain saddle could be another contributor.
Locating the saddle on the crossover is best for noise reduction since a pipe placed directly under the sink may produce amplified sound. However, an RO system will always make some noise when it runs over.
Taste and Odor
Taste and odor are mostly associated with filters that need changing, a complete tank and system sanitation need, or a membrane failure (from high TDS breakthrough).
A well water application that may contain dissolved gas, like hydrogen sulfide or methane (rotten egg smell) will concentrate and enhance the odor. It's possible that you may not know you have a hydrogen sulfide issue until it concentrates through the membrane. On-board carbon filtration will not hold gases for long, so you may not detect an odor in a new system for several days. These issues must be corrected prior to installing a new reverse osmosis system.
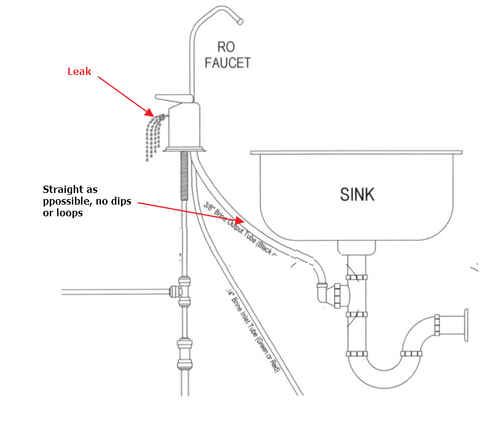
Leaks from a faucet air gap
These leaks are common in newly installed RO systems. The air gap directs water from the RO system through an air gap or backflow preventer on the way to the drain. Water flows from the air gap to the drain by gravity alone. Leaving too much tubing on this connection is the most common installation error. If the tubing is not as straight as possible to the drain saddle connection, water will come out of the air gap hole in the base of the faucet, especially with declined and inclined connections.
Other causes for system malfunction could include a clogged drain line or connection where the tube attaches to the drain. This can happen over time as debris collects in the base of the fitting. If all is clear, then make sure the hole in the drain line itself is in line with the saddle fitting.
Permeate flow rate
The best way to establish membrane function is by testing the permeate flow rate. With a few exceptions, the membrane of most RO systems running directly to the tank produce the product water. By shutting the tank valve off and opening the faucet, the membrane production will flow directly to the faucet. Once the "fast drip" is consistent, collect it in a measuring cup for 60 seconds.
with normal feed pressure and water temperatures, the amount accumulated in 60 seconds should closely match the numbers on the chart below.
| Membrane Rating | Permeate Rate- ounces/min | Drain Flow Rate- (mi/min)/ ounces |
| 15 gpd | 1- 1.3 | 100- 110/ 3.4- 4 |
| 18 gpd | 1.3- 1.8 | 180/ 6 |
| 25 gpd | 2 | 250/ 8.5 |
| 36 gpd | 2.5- 3 | 300/ 10 |
| 50 gpd | 3- 4 | 350- 400/ 11- 13.5 |
| 75 gpd | 4.5- 6 | 575- 650/ 19-22 |
| 100 gpd | 8- 9 | 730- 900/ 25-30 |
| 150 gpd | 10- 13 | 1200- 40.5 |
Note: Always make sure the system is not shut off and is making water to run these flow tests. Using a TDS meter would give you additional data.
Drain flow rate
To determine whether you have the right amount of flow restriction to provide the driving force pressure, disconnect the drain line where it connects to the drain saddle. Point the open tube into a bucket and then measure the water with a large measuring cup for 30 seconds. Multiply the results by two and compare the drain flow rate numbers to the chart above.
Here's what you can determine from your results:
Both results are within the acceptable range: The problems are not the pressure, membrane, or prefilters. The membrane has adequate pressure and flow and no clogs.
Both results are equally below the acceptable range: If the system's design allows, remove the prefilters from their housings and run the flow rate test again. If there's not change, you may have a pressure problem. If the flow rates return to the acceptable range, then you need to replace your prefilters.
The drain flow rate is close, but the permeate flow rate is next to nothing: This could be an indication that the membrane has calcified or is scaled with hardness or the has fouled. It should be replaced, and additional pre-treatment may be required. This could also indicate high TDS and low pressure. The higher the TDS, the more pressure is needed to create reverse osmosis.
Drain flow rate is beyond acceptable, but the permeate flow is next to nothing: Check to see if the flow restrictor is in place. If the restictor has failed or is lacking driving force pressure to the membrane, then the membrane will not produce water.
Both the drain and permeate flows are zero: Check prefilters and make sure the water supply is on. Then, disconnect the feed line where it connects to the inlet of the system to ensure that the system is receiving water. To do so, turn the water off and disconnect the tubing. Point the tubing into a bucket as you turn the water back on.
Fitting or housing leaks
Housing leaks are almost always O-ring related. Either the O-ring is not where it should be, or it has been compromised. Reused O-rings may stretch when removing the housing to change filters. It's always a good idea to have an extra set of O-rings and some silicon O-ring lubricant on hand.
Why a fitting may leak
Tubing is not pushed fully into the fitting to create a proper seal. Small diameter tubes, such as 1/4 and 3/4 will insert nearly 1" into the fitting. To ensure the seal, make a mark on the end of the tubing at 3/4", and make sure the line disappears when the tubing is inserted.
Tubing was not cut straight. Thus, it did not pass through the internal O-ring for a proper seal.
A deep scratch on the tubing is allowing water to pass through. Each time tubing is inserted then released from fittings, the tubing gets scratched. Eventually, these scratches become deep enough that the O-ring can no longer seal it completely. It's a good idea to replace any worn or scratched tubing that inserts into a fitting.
If you do not want to do everething by yourself, just call us:
(929) 357 4522
ClearLifeNY ( Your local water purefication company)
Our tehcnicians will come to test and fix your RO filter